
Let's get your machine working
Dyson Cyclone V10 Animal (Black)
-
SV12_SV27
-
Troubleshooting
-
Performance
-
Solve the problem using the lights
-
Blockage light
-
Blockage light showing with wand and tools removed
-
Cyclone checked light still showing
-
Issue resolved
-
Filter wash step-by-step
-
Replacement part required
-
Issue resolved
-
Blockage light not showing with wand and tools removed
-
Direct drive cleaner head
-
Replacement part required
-
Issue resolved
-
Hair screw tool
-
Replacement part required
-
Hair screw tool step by step
-
Motorbar cleaner head
-
Replacement part required
-
Mini motorised head
-
Replacement part required
-
Soft roller cleaner head
-
Replacement part required
-
Blue battery lights
-
Replacement part required
-
Has power
-
Issue resolved
-
Replacement part required
-
Replacement part required
-
Replacement part required
-
Flashing filter light
-
Issue resolved
-
Replacement part required
-
No lights
-
Replacement part required
-
Replacement part required
-
Red battery lights
-
Replacement part required
-
Replacement part required
-
Replacement part required
-
Solid/constant filter light
-
Filter wash step-by-step
-
Replacement part required
-
Issue resolved
-
Solve the problem using a symptom
-
Brush bar not spinning/spinning intermittently
-
The brush bar does not spin on any cleaner head
-
Replacement part required
-
Direct drive cleaner head
-
Issue resolved
-
Test another tool
-
Replacement part required
-
Test another tool
-
Replacement part required
-
Replacement part required
-
Hair screw tool
-
Issue resolved
-
Hair screw tool step by step
-
Test another tool
-
Replacement part required
-
Test the tool without the wand
-
Replacement part required
-
Replacement part required
-
Motorbar cleaner head
-
Issue resolved
-
Test another tool
-
Replacement part required
-
Test another tool
-
Replacement part required
-
Replacement part required
-
Mini motorised head
-
Issue resolved
-
Test another tool
-
Replacement part required
-
Test another tool
-
Replacement part required
-
Replacement part required
-
Soft roller cleaner head
-
Issue resolved
-
Test another tool
-
Replacement part required
-
Test another tool
-
Replacement part required
-
Replacement part required
-
Unusual noise
-
Grating or rattle
-
Test the machine
-
Replacement part required
-
Check the cyclone
-
Cyclone checked resolved
-
Grating or rattle with tools
-
Direct drive cleaner head
-
DD CH checked noise present
-
Tool checked resolved
-
Soft roller cleaner head
-
SR CH checked noise present
-
Motorbar cleaner head
-
MB CH checked noise present
-
Mini motorised head
-
HST checked noise present
-
Hair screw tool
-
Hair screw tool step by step
-
Machine is pulsating
-
Check wand and tools
-
Accessory blocked
-
Issue resolved
-
Tool checked not resolved
-
Replacement part required
-
Issue resolved
-
Filter wash step-by-step
-
Direct drive cleaner head
-
Issue resolved
-
Hair screw tool
-
Issue resolved
-
Motorbar cleaner head
-
Issue resolved
-
Mini motorised head
-
Issue resolved
-
No attachment
-
Soft roller cleaner head
-
Issue resolved
-
Issue resolved
-
High pitched whistle
-
Select floor tool
-
Replacement part required
-
Not picking up as well as usual
-
Unusual smell
-
Issue not resolved, please speak to our Customer Support Team
-
Damp or musty smell
-
Issue resolved
-
Bin cleaned, not resolved
-
Replacement part required
-
Issue resolved
-
Filter wash step-by-step
-
Issue not resolved, please speak to our Customer Support Team
-
Cutting out
-
Machine has no power
-
Machine has power
-
No power
-
Replacement part required
-
Battery not lasting as long/poor run time
-
Replacement part required
-
Issue resolved
-
Bin will not stay on the machine
-
How to locate the serial number
-
Replacement parts
-
Accessories and Consumables
-
Dyson Cyclone V10 Dok™
-
Purchase part
-
Part replacement instructions
-
Issue resolved
-
Issue resolved
-
Tools and accessories
-
Purchase part
-
Part replacement instructions
-
Issue not resolved, please speak to our Customer Support Team
-
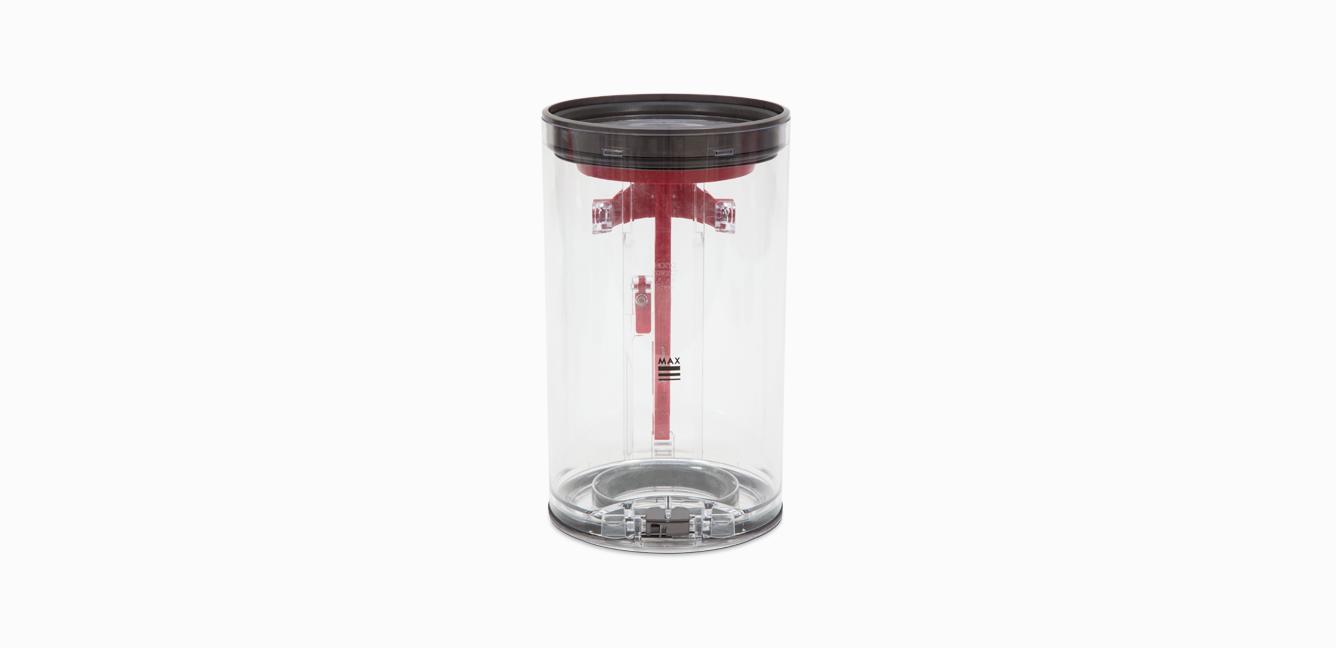
Main body and cyclone
-
Battery
-
Purchase part
-
Part replacement instructions
-
Read the step-by-step guide on replacing the battery
-
Bin
-
Purchase part
-
Part replacement instructions
-
Read the step-by-step guide on replacing the bin
-
Filter
-
Purchase part
-
Part replacement instructions
-
Main body and cyclone
-
Purchase part
-
Part replacement instructions
-
Read the step-by-step guide on replacing the main body and cyclone
-
Direct Drive cleaner head
-
Brush bar
-
Purchase part
-
Part replacement instructions
-
Quick release motorhead
-
Purchase part
-
Part replacement instructions
-
Rear seal
-
Purchase part
-
Part replacement instructions
-
Soft roller cleaner head
-
Rear brush bar
-
Purchase part
-
Part replacement instructions
-
Read the step-by-step guide on replacing the rear brush bar
-
Soft roller cleaner head
-
Purchase part
-
Part replacement instructions
-
Soft roller brush bar
-
Purchase part
-
Part replacement instructions
-
Read the step-by-step guide on replacing the soft roller brush bar
-
Soft roller end cap
-
Purchase part
-
Part replacement instructions
-
Wand, Charger & Dock
-
Hair screw tool brush bar
-
Purchase part
-
Part replacement instructions
-
Read the step-by-step guide on replacing the hair screw tool brush bar
-
Hair screw tool neck
-
Purchase part
-
Part replacement instructions
-
Read the step-by-step guide on replacing the hair screw tool neck
-
Hair screw tool soleplate
-
Purchase part
-
Part replacement instructions
-
Read the step-by-step guide on replacing the hair screw tool soleplate
-
Hair screw tool
-
Purchase part
-
Part replacement instructions
-
Charger
-
Purchase part
-
Part replacement instructions
-
Read the step-by-step guide on replacing the charger
-
Combination tool
-
Purchase part
-
Part replacement instructions
-
Crevice tool
-
Purchase part
-
Part replacement instructions
-
Docking station
-
Purchase part
-
Part replacement instructions
-
Read the step-by-step guide on replacing the docking station
-
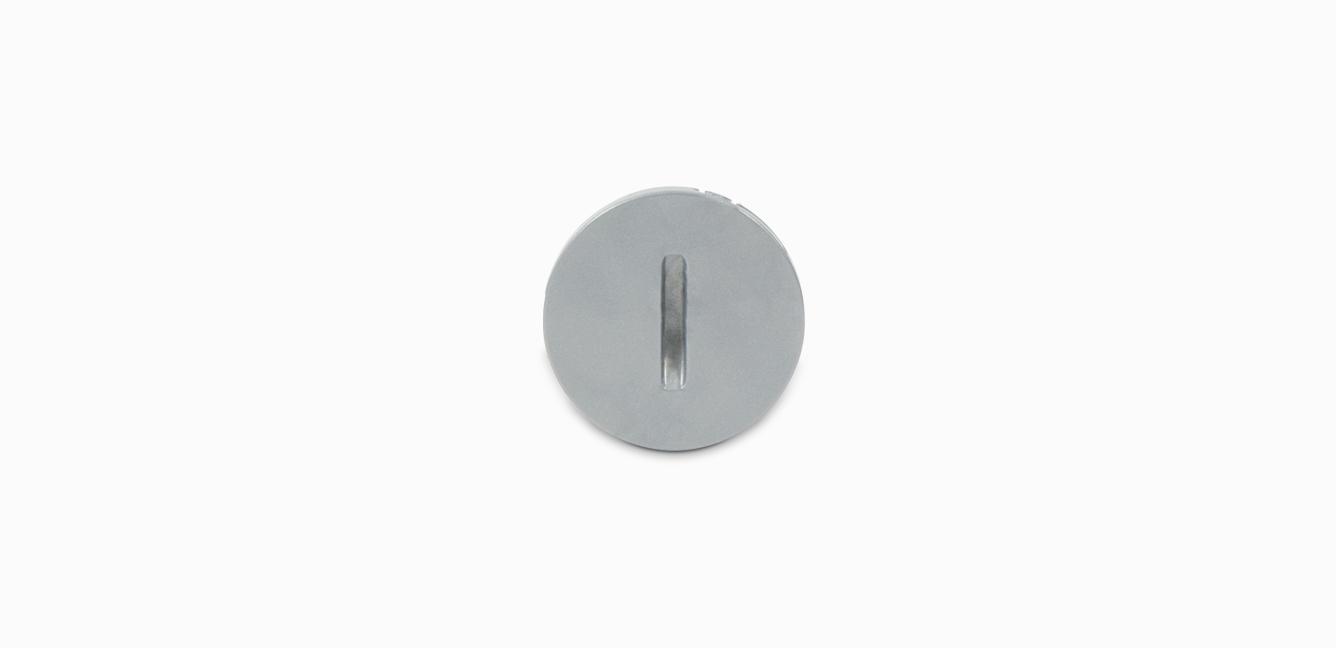
Jack cover
-
Purchase part
-
Part replacement instructions
-
Mini motorised tool
-
Purchase part
-
Part replacement instructions
-
Mini motorised tool brush bar
-
Purchase part
-
Part replacement instructions
-
Mini motorised tool end cap
-
Purchase part
-
Part replacement instructions
-
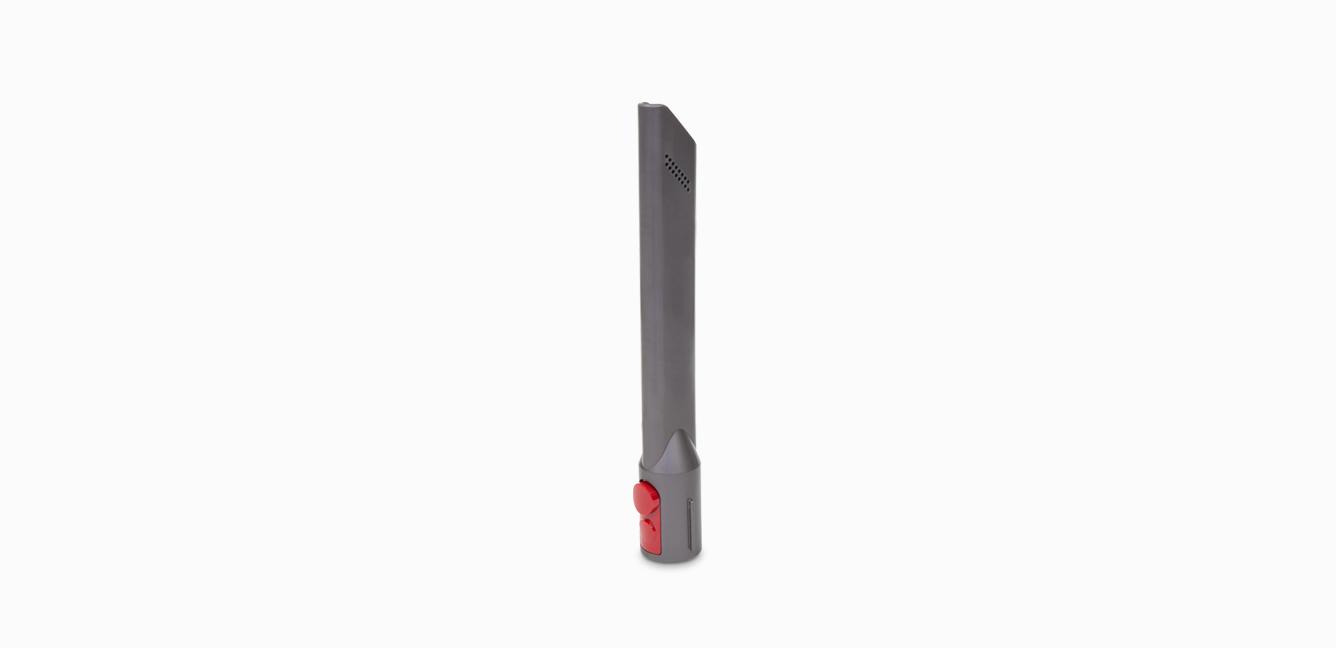
Wand
-
Purchase part
-
Part replacement instructions
-
We're glad the problem's been solved.
Please let us know if there's anything else we can help you with.
You might need a replacement part.
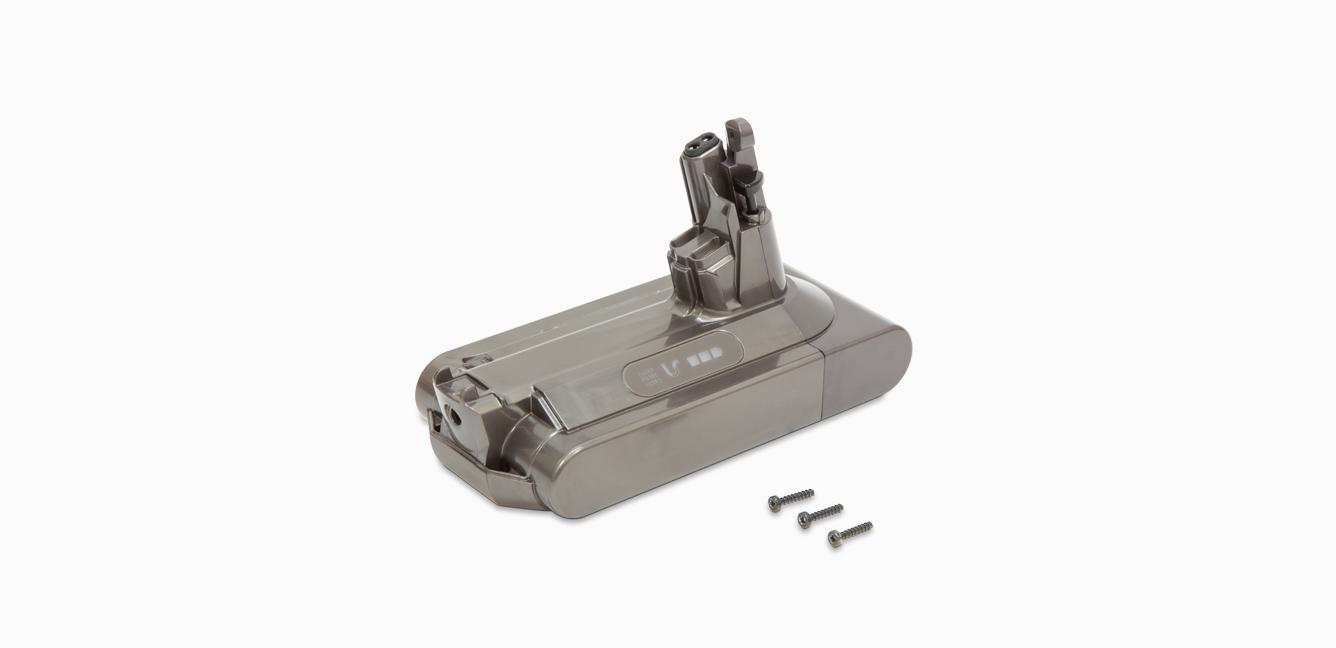
It looks like the Battery is not working. You can solve this by ordering a new one below.
Battery
Part no. 969352-03
Replacement power pack and screws for your Dyson vacuum cleaner.
$174.99
Battery
Part no. 969352-03
Replacement power pack and screws for your Dyson vacuum cleaner.
$174.99
$174.99
We're glad the problem's been solved.
Please let us know if there's anything else we can help you with.
You might need a replacement part.
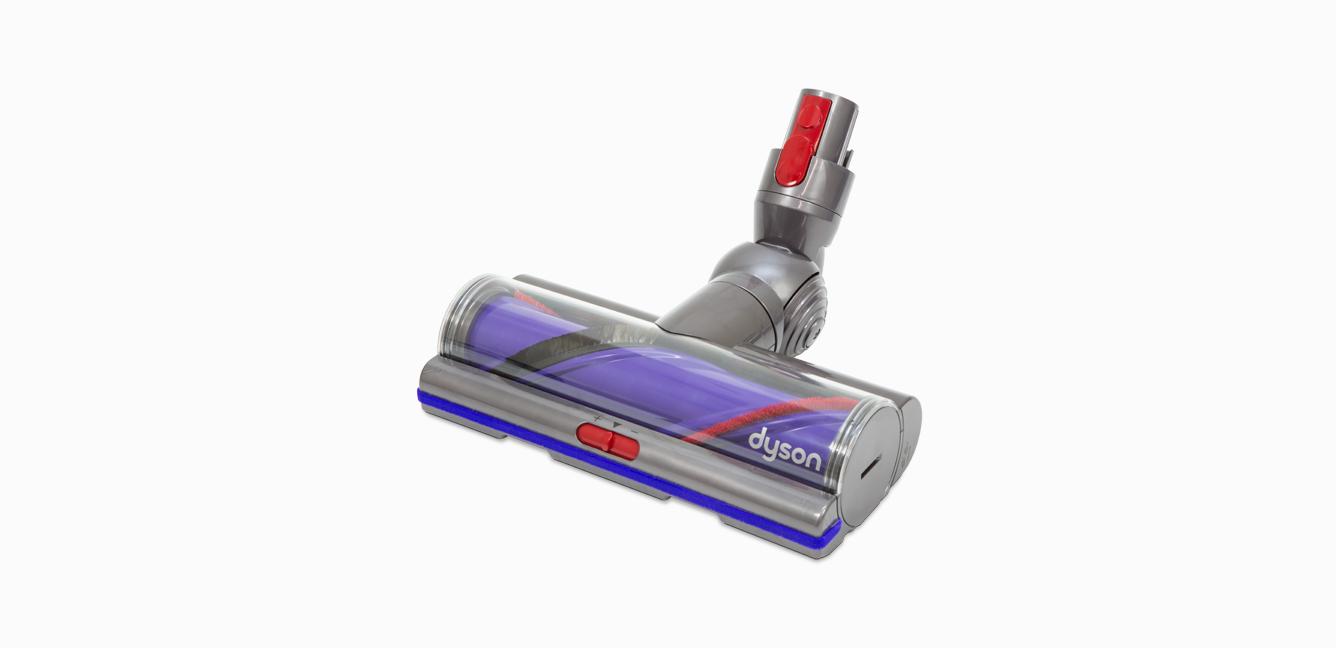
It looks like the Torque drive cleaner head is not working. You can solve this by ordering a new one below.
Torque drive cleaner head
Part no. 969110-01
Replacement torque drive cleaner head for your Dyson vacuum cleaner.
$142.99
Torque drive cleaner head
Part no. 969110-01
Replacement torque drive cleaner head for your Dyson vacuum cleaner.
$142.99
We're glad the problem's been solved.
Please let us know if there's anything else we can help you with.
Apologies. We can’t help you online.
But our Customer Support Team will be able to solve your problem.
Call us on 1-877-397-6622
You might need to arrange a visit from a Dyson expert.
It looks like the Motorbar™ cleaner head isn't working. A new one will need to be replaced by a Dyson Expert.
Please contact us. Our helpline will be able to arrange an appointment for you.
Motorbar™ cleaner head
Part no. 972182-01
$129.99
Motorbar™ cleaner head
Part no. 972182-01
$129.99
Apologies. We can’t help you online.
But our Customer Support Team will be able to solve your problem.
Call us on 1-877-397-6622
Apologies. We can’t help you online.
But our Customer Support Team will be able to solve your problem.
Call us on 1-877-397-6622
You might need a replacement part.
It looks like the Main body and cyclone is not working. You can solve this by ordering a new one below.
Main body and cyclone
Part no. 969596-05
Replacement main body and screws for your Dyson cordless vacuum.
$142.99

Main body and cyclone
Part no. 969596-05
Replacement main body and screws for your Dyson cordless vacuum.
$142.99
How to install this part
We're glad the problem's been solved.
Please let us know if there's anything else we can help you with.
You might need a replacement part.
It looks like the Main body and cyclone is not working. You can solve this by ordering a new one below.
Main body and cyclone
Part no. 969596-05
Replacement main body and screws for your Dyson cordless vacuum.
$142.99
Main body and cyclone
Part no. 969596-05
Replacement main body and screws for your Dyson cordless vacuum.
$142.99
How to install this part
You might need a replacement part.
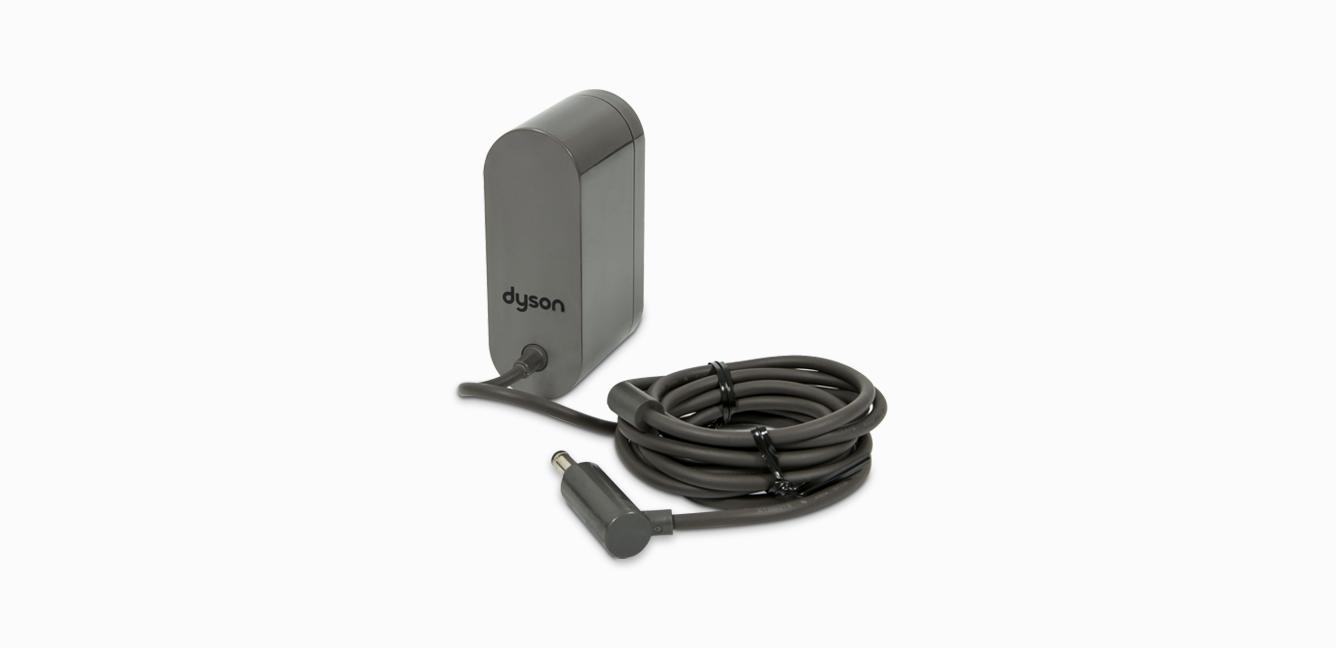
It looks like the Charger is not working. You can solve this by ordering a new one below.
Charger
Part no. 969350-02
Charges your vacuum with or without the Docking station
$39.99
Charger
Part no. 969350-02
Charges your vacuum with or without the Docking station
$39.99
We're glad the problem's been solved.
Please let us know if there's anything else we can help you with.
Apologies. We can’t help you online.
But our Customer Support Team will be able to solve your problem.
Call us on 1-877-397-6622
You might need a replacement part.
It looks like the Battery is not working. You can solve this by ordering a new one below.
Battery
Part no. 969352-03
Replacement power pack and screws for your Dyson vacuum cleaner.
$174.99
Battery
Part no. 969352-03
Replacement power pack and screws for your Dyson vacuum cleaner.
$174.99
$174.99
You might need a replacement part.
It looks like the Charger is not working. You can solve this by ordering a new one below.
Charger
Part no. 969350-02
Charges your vacuum with or without the Docking station
$39.99
Charger
Part no. 969350-02
Charges your vacuum with or without the Docking station
$39.99
You might need a replacement part.
It looks like the Main body and cyclone is not working. You can solve this by ordering a new one below.
Main body and cyclone
Part no. 969596-05
Replacement main body and screws for your Dyson cordless vacuum.
$142.99
Main body and cyclone
Part no. 969596-05
Replacement main body and screws for your Dyson cordless vacuum.
$142.99
How to install this part
Apologies. We can’t help you online.
But our Customer Support Team will be able to solve your problem.
Call us on 1-877-397-6622
We're glad the problem's been solved.
Please let us know if there's anything else we can help you with.
Apologies. We can’t help you online.
But our Customer Support Team will be able to solve your problem.
Call us on 1-877-397-6622
You might need a replacement part.
It looks like the Wand is not working. You can solve this by ordering a new one below.
Wand
Part no. 969109-13
Replacement wand for your Dyson vacuum cleaner.
$32.99

Wand
Part no. 969109-13
Replacement wand for your Dyson vacuum cleaner.
$32.99
We're glad the problem's been solved.
Please let us know if there's anything else we can help you with.
You might need a replacement part.
It looks like the Torque drive cleaner head is not working. You can solve this by ordering a new one below.
Torque drive cleaner head
Part no. 969110-01
Replacement torque drive cleaner head for your Dyson vacuum cleaner.
$142.99
Torque drive cleaner head
Part no. 969110-01
Replacement torque drive cleaner head for your Dyson vacuum cleaner.
$142.99
Apologies. We can’t help you online.
But our Customer Support Team will be able to solve your problem.
Call us on 1-877-397-6622
You might need a replacement part.
It looks like the Wand is not working. You can solve this by ordering a new one below.
Wand
Part no. 969109-13
Replacement wand for your Dyson vacuum cleaner.
$32.99
Wand
Part no. 969109-13
Replacement wand for your Dyson vacuum cleaner.
$32.99
We're glad the problem's been solved.
Please let us know if there's anything else we can help you with.
You might need a replacement part.
It looks like the Wand is not working. You can solve this by ordering a new one below.
Wand
Part no. 969109-13
Replacement wand for your Dyson vacuum cleaner.
$32.99
Wand
Part no. 969109-13
Replacement wand for your Dyson vacuum cleaner.
$32.99
Apologies. We can’t help you online.
But our Customer Support Team will be able to solve your problem.
Call us on 1-877-397-6622
You might need a replacement part.
It looks like the Wand is not working. You can solve this by ordering a new one below.
Wand
Part no. 969109-13
Replacement wand for your Dyson vacuum cleaner.
$32.99
Wand
Part no. 969109-13
Replacement wand for your Dyson vacuum cleaner.
$32.99
We're glad the problem's been solved.
Please let us know if there's anything else we can help you with.
Apologies. We can’t help you online.
But our Customer Support Team will be able to solve your problem.
Call us on 1-877-397-6622
Apologies. We can’t help you online.
But our Customer Support Team will be able to solve your problem.
Call us on 1-877-397-6622
You might need a replacement part.
It looks like the Wand is not working. You can solve this by ordering a new one below.
Wand
Part no. 969109-13
Replacement wand for your Dyson vacuum cleaner.
$32.99
Wand
Part no. 969109-13
Replacement wand for your Dyson vacuum cleaner.
$32.99
We're glad the problem's been solved.
Please let us know if there's anything else we can help you with.
You might need a replacement part.
It looks like the Wand is not working. You can solve this by ordering a new one below.
Wand
Part no. 969109-13
Replacement wand for your Dyson vacuum cleaner.
$32.99
Wand
Part no. 969109-13
Replacement wand for your Dyson vacuum cleaner.
$32.99
Apologies. We can’t help you online.
But our Customer Support Team will be able to solve your problem.
Call us on 1-877-397-6622
You might need a replacement part.
It looks like the Wand is not working. You can solve this by ordering a new one below.
Wand
Part no. 969109-13
Replacement wand for your Dyson vacuum cleaner.
$32.99
Wand
Part no. 969109-13
Replacement wand for your Dyson vacuum cleaner.
$32.99
You might need a replacement part.
It looks like the Main body and cyclone is not working. You can solve this by ordering a new one below.
Main body and cyclone
Part no. 969596-05
Replacement main body and screws for your Dyson cordless vacuum.
$142.99
Main body and cyclone
Part no. 969596-05
Replacement main body and screws for your Dyson cordless vacuum.
$142.99
How to install this part
We're glad the problem's been solved.
Please let us know if there's anything else we can help you with.
You might need a replacement part.
It looks like the Torque drive cleaner head is not working. You can solve this by ordering a new one below.
Torque drive cleaner head
Part no. 969110-01
Replacement torque drive cleaner head for your Dyson vacuum cleaner.
$142.99
Torque drive cleaner head
Part no. 969110-01
Replacement torque drive cleaner head for your Dyson vacuum cleaner.
$142.99
We're glad the problem's been solved.
Please let us know if there's anything else we can help you with.
Apologies. We can’t help you online.
But our Customer Support Team will be able to solve your problem.
Call us on 1-877-397-6622
You might need a replacement part.
It looks like the Main body and cyclone is not working. You can solve this by ordering a new one below.
Main body and cyclone
Part no. 969596-05
Replacement main body and screws for your Dyson cordless vacuum.
$142.99
Main body and cyclone
Part no. 969596-05
Replacement main body and screws for your Dyson cordless vacuum.
$142.99
How to install this part
Apologies. We can’t help you online.
But our Customer Support Team will be able to solve your problem.
Call us on 1-877-397-6622
We're glad the problem's been solved.
Please let us know if there's anything else we can help you with.
You might need a replacement part.
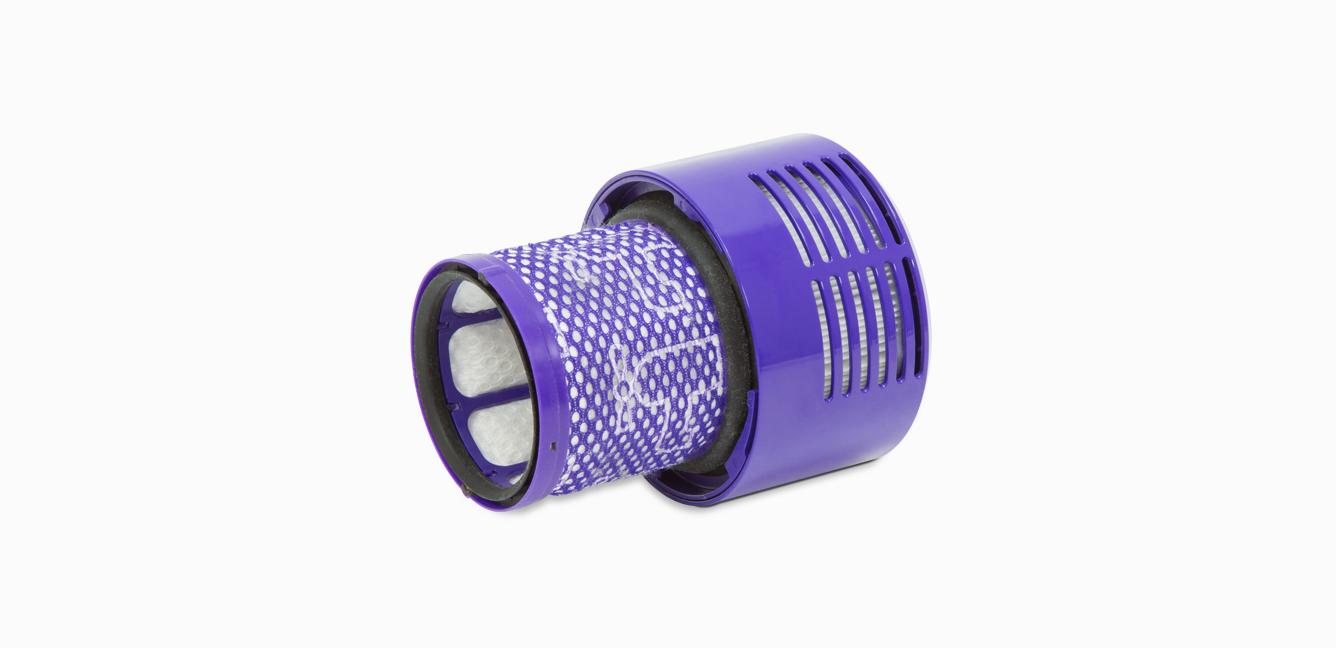
It looks like the Dyson vacuum filter is not working. You can solve this by ordering a new one below.
Dyson vacuum filter
Part no. 969082-01
Dyson V10™ vacuums
$43.99
Dyson vacuum filter
Part no. 969082-01
Dyson V10™ vacuums
$43.99
$43.99
We're glad the problem's been solved.
Please let us know if there's anything else we can help you with.
We're glad the problem's been solved.
Please let us know if there's anything else we can help you with.
We're glad the problem's been solved.
Please let us know if there's anything else we can help you with.
We're glad the problem's been solved.
Please let us know if there's anything else we can help you with.
We're glad the problem's been solved.
Please let us know if there's anything else we can help you with.
We're glad the problem's been solved.
Please let us know if there's anything else we can help you with.
We're glad the problem's been solved.
Please let us know if there's anything else we can help you with.
We're glad the problem's been solved.
Please let us know if there's anything else we can help you with.
Apologies. We can’t help you online.
But our Customer Support Team will be able to solve your problem.
Call us on 1-877-397-6622
We're glad the problem's been solved.
Please let us know if there's anything else we can help you with.
You might need a replacement part.
It looks like the Dyson vacuum filter is not working. You can solve this by ordering a new one below.
Dyson vacuum filter
Part no. 969082-01
Dyson V10™ vacuums
$43.99
Dyson vacuum filter
Part no. 969082-01
Dyson V10™ vacuums
$43.99
$43.99
We're glad the problem's been solved.
Please let us know if there's anything else we can help you with.
You might need a replacement part.
It looks like the Main body and cyclone is not working. You can solve this by ordering a new one below.
Main body and cyclone
Part no. 969596-05
Replacement main body and screws for your Dyson cordless vacuum.
$142.99
Main body and cyclone
Part no. 969596-05
Replacement main body and screws for your Dyson cordless vacuum.
$142.99
How to install this part
We're glad the problem's been solved.
Please let us know if there's anything else we can help you with.
You might need a replacement part.
It looks like the Dyson Floor Dok™ is not working. You can solve this by ordering a new one below.
Dyson Floor Dok™
Part no. 971445-01
Free-standing aluminum dock, engineered to store and charge your Dyson V15™ Detect, Dyson Outsize, and Dyson V11™ vacuum and tools.
$199.99

Dyson Floor Dok™
Part no. 971445-01
Free-standing aluminum dock, engineered to store and charge your Dyson V15™ Detect, Dyson Outsize, and Dyson V11™ vacuum and tools.
$199.99
Apologies. We can't help you online.
But our Customer Support Team will be able to solve your problem. Call us on 1-877-397-6622
We're glad the problem's been solved.
Please let us know if there's anything else we can help you with.
Apologies. We can’t help you online.
But our Customer Support Team will be able to solve your problem.
Call us on 1-877-397-6622
Apologies. We can't help you online.
But our Customer Support Team will be able to solve your problem. Call us on 1-877-397-6622
You might need a replacement part.
It looks like the Battery is not working. You can solve this by ordering a new one below.
Battery
Part no. 969352-03
Replacement power pack and screws for your Dyson vacuum cleaner.
$174.99
Battery
Part no. 969352-03
Replacement power pack and screws for your Dyson vacuum cleaner.
$174.99
$174.99
You might need a replacement part.
It looks like the Bin is not working. You can solve this by ordering a new one below.
Bin
Part no. 969509-01
Replacement bin for your Dyson cordless vacuum.
$43.99
Bin
Part no. 969509-01
Replacement bin for your Dyson cordless vacuum.
$43.99
How to install this part
Apologies. We can’t help you online.
But our Customer Support Team will be able to solve your problem.
Call us on 1-877-397-6622
You might need a replacement part.
It looks like the Main body and cyclone is not working. You can solve this by ordering a new one below.
Main body and cyclone
Part no. 969596-05
Replacement main body and screws for your Dyson cordless vacuum.
$142.99
Main body and cyclone
Part no. 969596-05
Replacement main body and screws for your Dyson cordless vacuum.
$142.99
How to install this part
Apologies. We can’t help you online.
But our Customer Support Team will be able to solve your problem.
Call us on 1-877-397-6622
Apologies. We can’t help you online.
But our Customer Support Team will be able to solve your problem.
Call us on 1-877-397-6622
Apologies. We can’t help you online.
But our Customer Support Team will be able to solve your problem.
Call us on 1-877-397-6622
Apologies. We can’t help you online.
But our Customer Support Team will be able to solve your problem.
Call us on 1-877-397-6622
Apologies. We can’t help you online.
But our Customer Support Team will be able to solve your problem.
Call us on 1-877-397-6622
Apologies. We can’t help you online.
But our Customer Support Team will be able to solve your problem.
Call us on 1-877-397-6622
Apologies. We can’t help you online.
But our Customer Support Team will be able to solve your problem.
Call us on 1-877-397-6622
Apologies. We can’t help you online.
But our Customer Support Team will be able to solve your problem.
Call us on 1-877-397-6622
Apologies. We can’t help you online.
But our Customer Support Team will be able to solve your problem.
Call us on 1-877-397-6622
Apologies. We can’t help you online.
But our Customer Support Team will be able to solve your problem.
Call us on 1-877-397-6622
Apologies. We can’t help you online.
But our Customer Support Team will be able to solve your problem.
Call us on 1-877-397-6622
Apologies. We can't help you online.
But our Customer Support Team will be able to solve your problem. Call us on 1-877-397-6622
You might need a replacement part.
It looks like the Combination tool is not working. You can solve this by ordering a new one below.
Combination tool
Part no. 967482-01
$29.99

Combination tool
Part no. 967482-01
$29.99
$29.99
You might need a replacement part.
It looks like the Crevice tool is not working. You can solve this by ordering a new one below.
Crevice tool
Part no. 967612-01
Engineered for precise cleaning around tricky edges and into hard-to-reach narrow spaces.
$29.99
Crevice tool
Part no. 967612-01
Engineered for precise cleaning around tricky edges and into hard-to-reach narrow spaces.
$29.99
$29.99
You might need to arrange a visit from a Dyson expert.
It looks like the Docking station isn't working. A new one will need to be replaced by a Dyson Expert.
Please contact us. Our helpline will be able to arrange an appointment for you.
Docking station
Part no. 969042-01
Wall-mounted dock to recharge your vacuum and tidily store tools
$32.99

Docking station
Part no. 969042-01
Wall-mounted dock to recharge your vacuum and tidily store tools
$32.99
Apologies. We can’t help you online.
But our Customer Support Team will be able to solve your problem.
Call us on 1-877-397-6622
You might need a replacement part.
It looks like the Mini motorized tool is not working. You can solve this by ordering a new one below.
Mini motorized tool
Part no. 967479-05
Replacement quick-release mini motorized tool for your Dyson vacuum cleaner.
$83.99

Mini motorized tool
Part no. 967479-05
Replacement quick-release mini motorized tool for your Dyson vacuum cleaner.
$83.99
Apologies. We can’t help you online.
But our Customer Support Team will be able to solve your problem.
Call us on 1-877-397-6622
You might need a replacement part.
It looks like the Mini motorized tool end cap is not working. You can solve this by ordering a new one below.
Mini motorized tool end cap
Part no. 967481-01
Replacement end cap for your Dyson vacuum cleaner.
$1.99
Mini motorized tool end cap
Part no. 967481-01
Replacement end cap for your Dyson vacuum cleaner.
$1.99
You might need a replacement part.
It looks like the Wand is not working. You can solve this by ordering a new one below.
Wand
Part no. 969109-13
Replacement wand for your Dyson vacuum cleaner.
$32.99
Wand
Part no. 969109-13
Replacement wand for your Dyson vacuum cleaner.
$32.99
Further help
Dyson Cyclone V10 Animal (Black)